Documentation
Table of contents
Settings
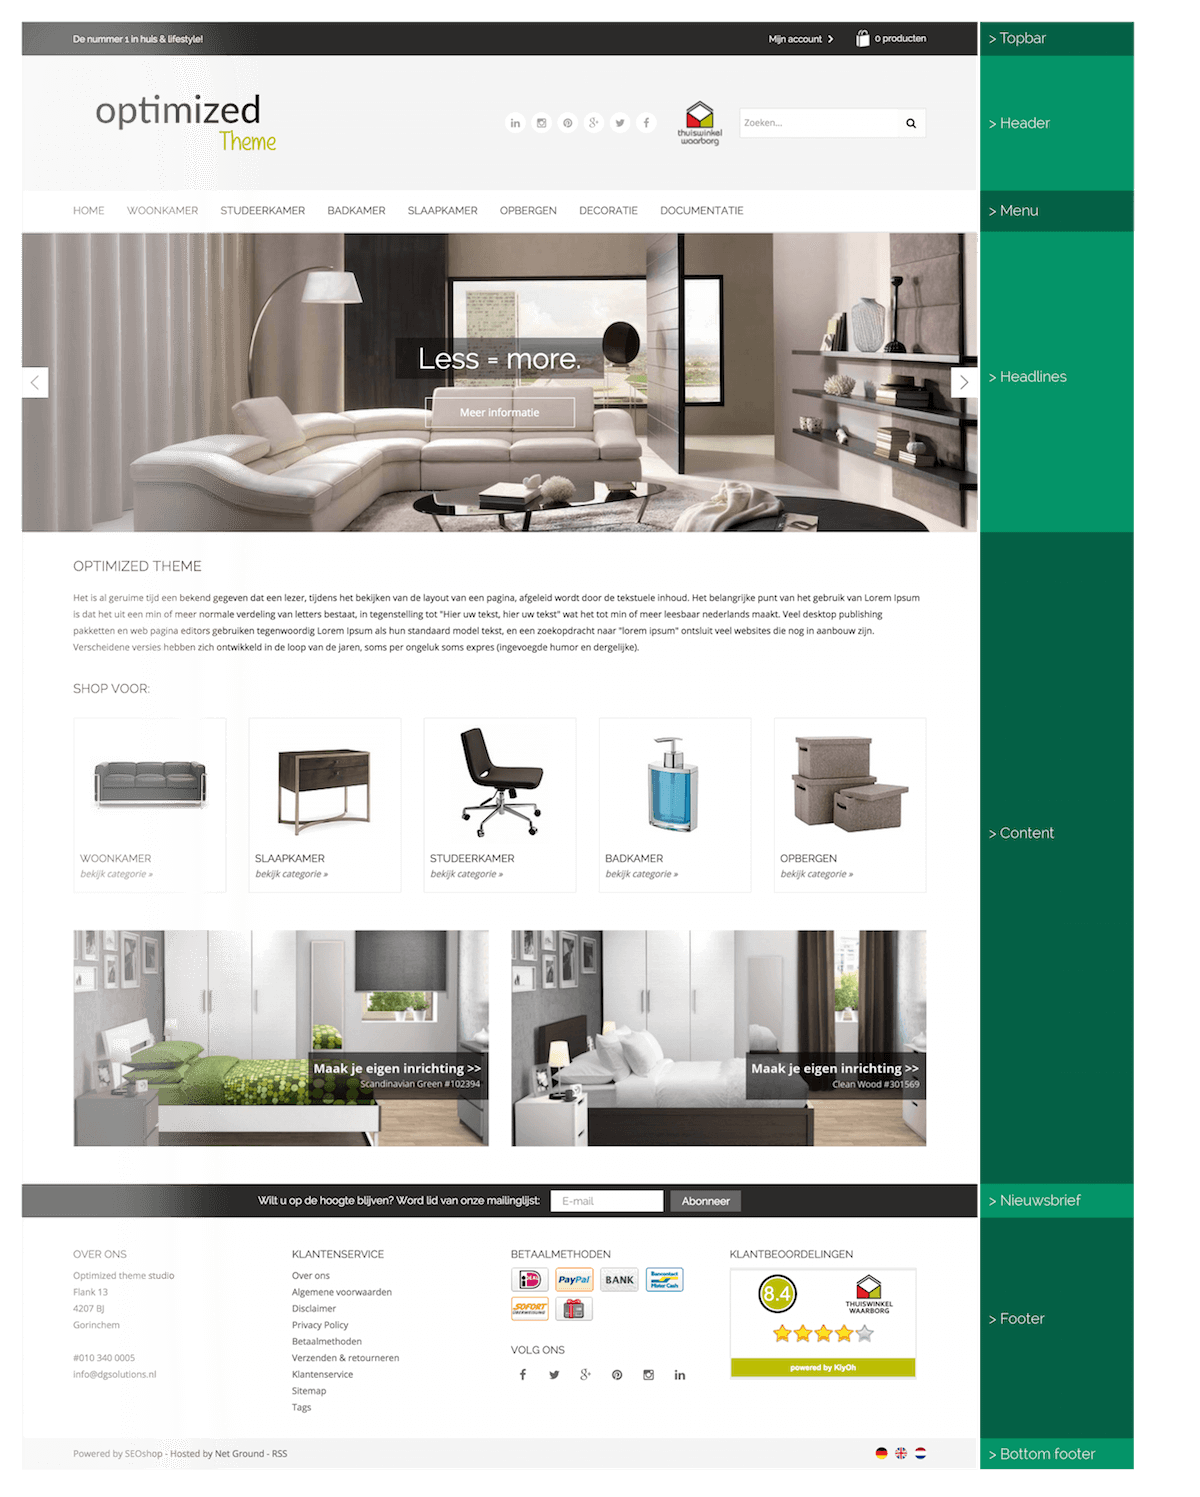
At 'Design' - 'Settings' you can see the different settings. With these settings you can customize the theme. To see which part of the theme has what name you can look in the infographic.
Change/Translate text
You can change and translate texts at 'Design' - 'Custom translations'.
Do you disagree with the standard translations provided by the system, or do you prefer certain system terms worded differently? If so, you may use Custom translations, by navigating to General > Design in the left menu of the back office. This involves words/phrases listed in the back office by default, which you cannot modify yourself. Think of a variety of links, such as About Us, Customer Service etc., or words used in the check-out area. If so desired, you may assign different names to them.
Note: Assigning different names does not alter the function of a page or option. If you modify a name in the check-out area, the input field will remain unchanged.
1. Click green plus icon in the navigation at the top of the screen to modify a key.
2. A pop-up window will appear, offering two options: Key or Existing translation. The key is the English name for a component, as listed in your store's code, for example About Us. Are you not sure about the correct value for a given key? Check the list provided by Existing Translation, and click the desired name, for example Customer Service.
3. You will be taken to a page where you can modify the associated translation. For example Contact or FAQ, instead of Customer Service. The modified translations will subsequently replace the original ones in the pages of your online store.
In the Elevated theme there are a few custom keys you can translate / change:
Keys:
1. 'Tagline' - This is the key for the sentence in the upper left of the webshop, when you use 'Header 1'.
2. 'Customtitlefooter' - This is the key for the title above the widget in the bottom right of the footer.
3. 'Headlinebutton' - This is the key for the text in the button, which is shown in the headlines.
4. 'USP1' - This is the key for the first Unique Selling Point, you can enter your first USP here.
5. 'USP2' - This is the key for the second Unique Selling Point, you enter your second USP here.
6. 'USP3' - This is the key for the third Unique Selling Point, you can enter your third USP here.
7. 'USP4' - This is the key for the fourth Unique Selling Point, you can enter your fourth USP here.
Image sizes
Recommended sizes:
Note: The size of the logo can be determined by yourself. The height of the header defines the maximum height of the logo.
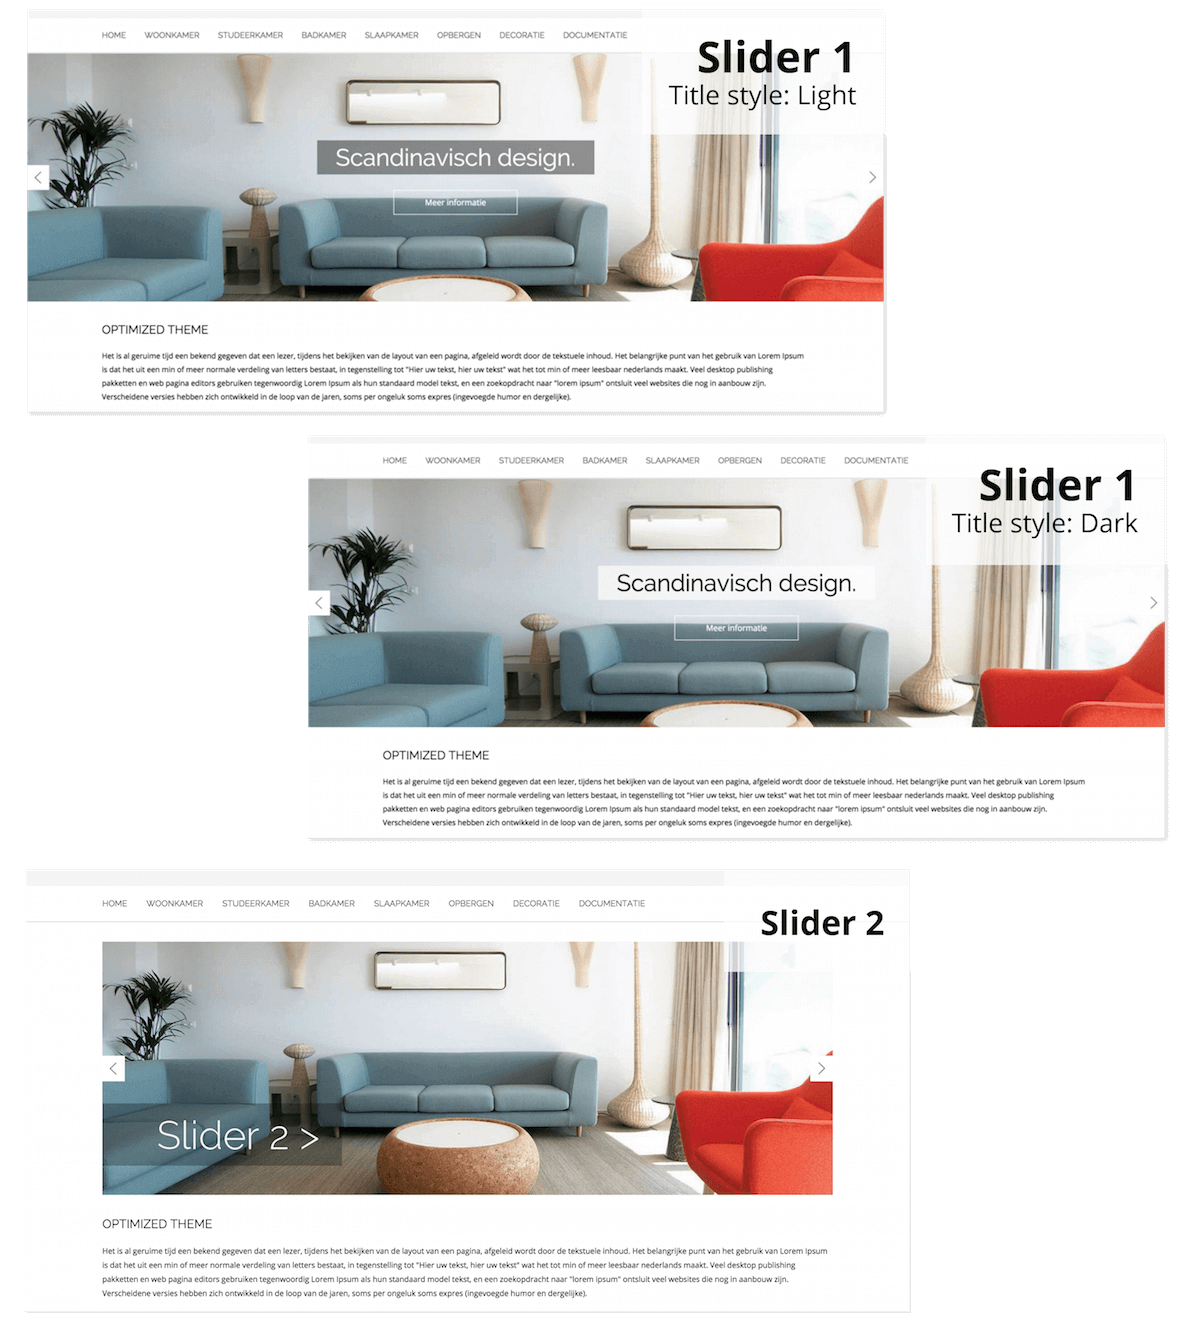
Headline image
Slider 1: 1500x630px
Slider 2: 1140x400px
Slider 1: 1500x630px
Slider 2: 1140x400px
Homepage banner image
650x340px
650x340px
Product image
450x450px
450x450px
Unique Selling Points
It's really easy to set up your own Unique Selling Points in your webshop. Here follows a step by step guide to show you how to show your USP's in your shop.
Step-by-step Guide (USP's)
1. Determine your Unique Selling Points
2. Go to 'Design' - 'Custom translations'.
3. Click the green plus icon in the navigation at the top of the screen.
4. Fill in 'USP1' at the empty 'Key' field and press 'Save'.
5. Enter your USP at the translation field. If you have a multilingual shop, you can translate your USP here too.
6. Repeat step 4 en 5 for the keys: 'USP2', 'USP3' and 'USP4'.
7. Go to 'Design' - 'Settings' - 'Unique Selling Points'.
8. Enter the URL to where your first USP should link to at 'USP 1 link'.
9. Enter the name of the icon that you want to show with the first USP at 'USP 1 icon'.
All icons that can be used, can be found on: http://fortawesome.github.io/Font-Awesome/icons/, enter the title of the icon only at 'USP 1 icon'. Example: 'heartbeat'.
10. Repeat step 8 en 9 for the other three USP's.
11. Determine the layout by selecting the text- and background color. You can also use a background image.
Example Settings Unique Selling Points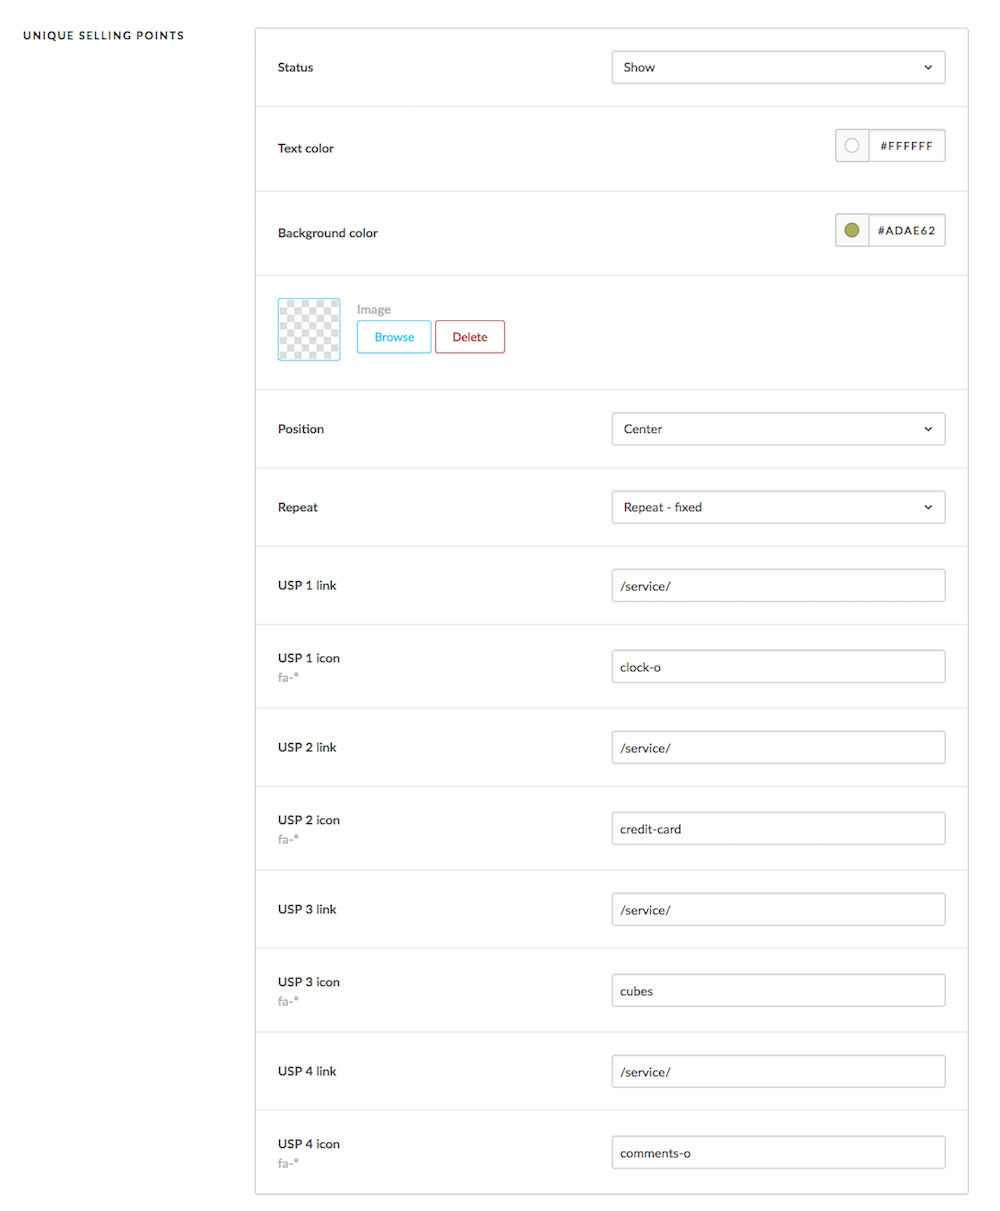
Headlines
Popup cart
You can select the popup cart, made by DGSolutions, to be shown in your shop. You'll need two settings to get this popup cart.
1. Go to 'Settings' - 'Advanced' - 'Stay on page'. Select 'Enabled'.
2. Go to 'Design' - 'Settings' - 'Settings' - 'Hide popup cart'. Make sure this option is not enabled.
1. Go to 'Settings' - 'Advanced' - 'Stay on page'. Select 'Enabled'.
2. Go to 'Design' - 'Settings' - 'Settings' - 'Hide popup cart'. Make sure this option is not enabled.
Homepage Banners
While looking at the loading speed of this theme, it appeared to be faster not to upload the homepage banners directly in the backoffice but via Tools - 'Files'. Here is a step-by-step guide to set up the homepage banners for the English language. You can repeat these steps if you want to use the Dutch and German banners (if you have a multilingual shop).
Step-by-step Guide (Homepage Banners)
1. Make two images for the homepage. Size: 650x340px. (Recommended size, you can differ in size.)
2. Go to Tools - 'Files'.
3. Click the green plus icon in the navigation at the top of the screen.
4. Upload the two images for the homepage here.
5. Copy the URL. This is the URL of your image: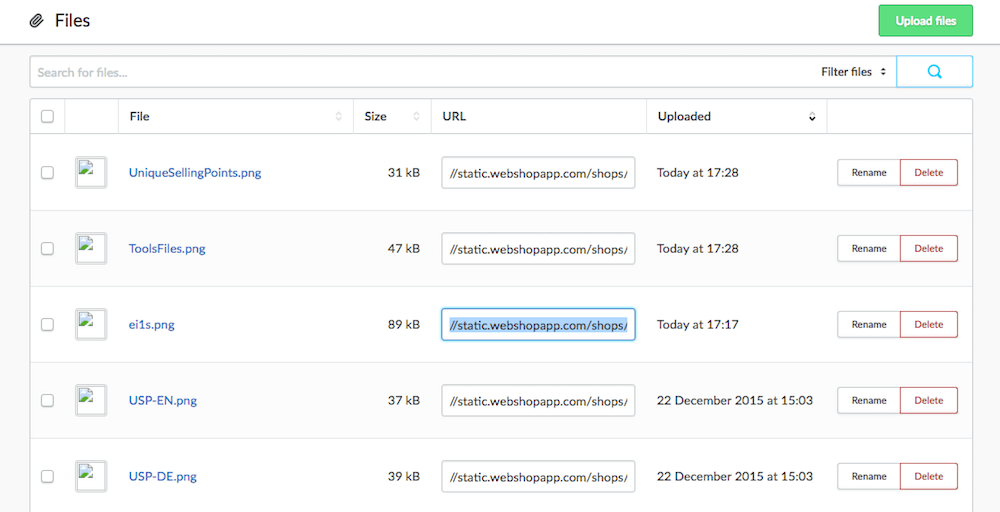
6. Paste this URL at 'Design' - 'Settings' - 'Home page banners' - Image 1 (EN).
7. Fill in a URL at 'Link 1 (EN)' where the first image should link to.
8. Repeat these steps for Image 2 and the other languages, if necessary.
Infographic
Frequently Asked Questions
My webshop is slower than the example theme, how does this happen? There are two really important things you need to care about, when setting up your shop / theme, in regards to speed:
1. Product- and category images are automatically optimized, however this doesn't happen at all other images. Make sure your logo, the homepage banners and the headlines are made in the correct size (Image sizes). Also use a compressor to make the image size even smaller!
Free online compressor: https://tinypng.com/
2. External apps slow your site down quite a lot. Try to avoid using external apps that are dependent on scripts, if you want an optimal loading speed. Can I adjust the animation speed of the headline slider? Yes, you can change this at 'Design' - 'Settings' - 'General' - Headlines autoscroll speed. Here you can enter the animation speed in milliseconds. This has to be at least 1500. Example: '5000'. (Every 5 seconds the headline will change). How can I easily place a widget (Kiyoh, Feedbackcompany, etc.)? When you have the code of the widget, you can easily place it in the footer. Go to 'Design' - 'Settings' - 'Footer' - Widget code and paste the whole code there. (For example the iframe code of Kiyoh). Where can I adjust my font? At 'Design' - 'Settings' - 'General'. You can change the font of the titles/headers (h1, h2, h3, etc.) and the font of all general text here. Where can I make my header bigger/smaller? At 'Design' - 'Settings' - 'Header' - Header height. You can adjust the height of the header in pixels. Example: '150'. (This will make the header 150 pixels big/high). Where is the language/currency switch? In the footer. How can I show my Unique Selling Points? Follow the step-by-step guide: Unique Selling Points
Support & Troubleshooting
Support If you have any questions about this theme, or need extra support, don't hesitate to contact DGSolutions. Send a mail to [email protected] or fill in the contact form at dgsolutions.nl.
Troubleshooting The Elevated theme uses Bootstrap 3.0 and Google Fonts. Go to the following websites for more information:
Bootstrap: Bootstrap
Google Fonts: Google fonts
Bootstrap: Bootstrap
Google Fonts: Google fonts